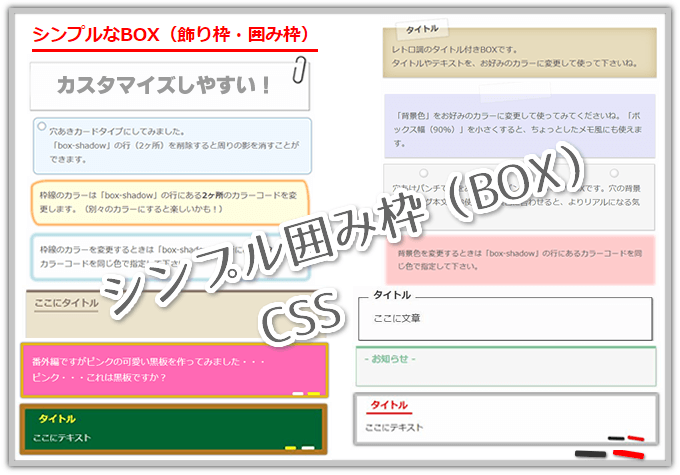
ブログの文中・文末に「まとめ」や「POINT」として囲み枠(BOX)を使うと、見やすくなって便利ですよね。アクセントとしても効果的です。
- CSSをスタイルシート(style.css)にコピペして下さいね。子テーマがある場合は子テーマstyle.cssへ
- 囲み枠はすべて「幅 90%」にしていますが「width: 90%;」の行を削除することで幅いっぱいに広げて使うことができます。
- ワードプレスの新ブロックエディター「Gutenberg(グーテンベルク)」でプラグイン不要の使い方を⇒こちらの記事で解説しています。
- 各BOXコードの上に表示している『サンプル囲み枠』はキャプチャ画像です。
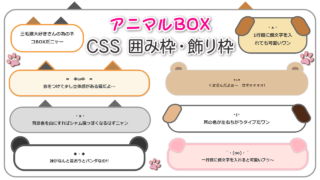
動物好きな方は (=^・^=) 遊びにきてニャ~
シンプル 普通の囲み枠
- 幅いっぱいに広げて使用する場合「width: 90%;」の行を削除して下さい。

CSS
/* シンプル 枠 1*/
.kakomi-box1 {
 margin: 2em auto;
 padding: 1em;
 width: 90%;
 background-color: #fff; /* 背景色 */
 border: 1px solid #ccc; /* 枠線 */
}
HTML
<div class="kakomi-box1">テキスト</div>

CSS
/* シンプル囲み枠 2*/
.kakomi-box2 {
 margin: 2em auto;
 padding: 1em;
 width: 90%;
 color: #666; /* 文字色 */
 background-color: #f7f7f7; /* 背景色 */
 border: 1px solid #ccc; /* 枠線 */
}
HTML
<div class="kakomi-box2">テキスト</div>
- 影をつけて立体感を出しました。

CSS
/* シンプル 枠(影)1 */
.kakomi-box3 {
 margin: 2em auto;
 padding: 1em;
 width: 90%;
 border: 1px solid #ccc; /* 枠線 */
 background-color: #fff; /* 背景色 */
 box-shadow: 1px 1px 2px #ccc;
}
HTML
<div class="kakomi-box3">テキスト</div>

CSS
/* シンプル 枠(影)2 */
.kakomi-box4 {
 margin: 2em auto;
 padding: 1em;
 width: 90%;
 background-color: #FFF5EE; /* 背景色 */
 box-shadow: 0 0 5px 1px #ccc; /* 影 */
}
HTML
<div class="kakomi-box4">テキスト</div>

CSS
/* シンプル角丸 枠 1 */
.kakomi-maru1 {
 margin: 2em auto;
 padding: 1em;
 width: 90%; /*幅の調節*/
 color: #666666; /*文字色*/
 background-color: #f7f7f7; /*背景色*/
 border: 2px solid #ccc; /*線の太さ・色*/
 border-radius: 8px; /*角の丸み*/
}
HTML
<div class="kakomi-maru1">テキスト</div>

CSS
/*シンプル角丸(影)枠 2*/
.kakomi-maru2 {
 margin: 2em auto;
 padding: 1em;
 width: 90%;
 color: #666666; /*文字色*/
 border: 2px solid #996633; /*線の太さ・色*/
 background-color: #fff; /*背景色*/
 box-shadow: -2px 5px 5px #e8d3c7; /*影*/
 border-radius: 20px; /*角の丸み*/
}
HTML
<div class="kakomi-maru2">テキスト</div>

CSS
/*シンプル角丸(影)枠 3*/
.kakomi-maru3 {
 margin: 2em auto;
 padding: 1em;
 width: 90%; /* ボックス幅 */
 background-color: #EEFFFF; /* ボックス背景色 */
 color: #666; /* 文章色 */
 box-shadow: 0 0 5px 1px #c0c0c0; /* 影 */
 border-radius: 10px; /* 角の丸み */
}
HTML
<div class="kakomi-maru3">テキスト</div>

CSS
/* 手書き風BOX 1 */
.kakomi-te1 {
 margin: 2em auto;
 padding: 1em 1.5em;
 width: 90%; /*幅の調節*/
 color: #777777; /* 文字色 */
 background-color: #fff; /* 背景色 */
 border: 4px solid #f6bfbc; /*線の太さ・色*/
 border-radius: 3em .8em 3em .7em/.9em 2em .8em 3em;
}
HTML
<div class="kakomi-te1">テキスト</div>
破線 ・ 点線 ・ 二重線 囲み枠
- 「border-radius」の数値を大きくすると、ボックスの角を丸くできます。
- 幅いっぱいに広げる場合は「width: 90%;」の行を削除して下さい。
- ボーダーを太め(3px)以上にするとハッキリします

CSS
/* 破線 枠 */
.kakomi-box8 {
 margin: 2em auto;
 padding: 1em;
 width: 90%;
 border: 3px dashed #c0c0c0; /*太さ・線種・色*/
 color: #a0a0a0; /* 文字色 */
 background-color: #FFF; /* 背景色 */
 border-radius: 1px; /*角の丸み*/
}
HTML
<div class="kakomi-box8">テキスト</div>

CSS
/* ドット 囲み枠 */
.kakomi-box9 {
 margin: 2em auto;
 padding: 1em;
 width: 90%;
 border: 5px dotted #f09199; /*太さ・線種・色*/
 background-color: #fff; /* 背景色 */
 border-radius: 1px; /*角の丸み*/
}
HTML
<div class="kakomi-box9">テキスト</div>

CSS
/* 二重線 囲み枠 */
.kakomi-box10 {
 margin: 2em auto;
 padding: 1em;
 width: 90%;
 border: 5px double #8491c3; /*太さ・線種・色*/
 color: #333; /* 文字色 */
 background-color: #fff; /* 背景色 */
 border-radius: 1px; /*角の丸み*/
}
HTML
<div class="kakomi-box10">ここにテキスト</div>
シンプル 「タイトル付」 囲み枠
- 幅いっぱいに広げる場合は「width: 90%;」の行を削除して下さい。
- タイトル部分の背景は「#fff」です。

CSS
/* タイトル付 枠 1 */
.kakomi-box11 {
 position: relative;
 margin: 2em auto;
 padding: 1.2em;
 color: #555555; /* 文章色 */
 background-color: #fff; /* 背景色 */
 border: 1px solid #555555; /* 枠線の太さ・色 */
 width: 90%;
}
.title-box11 {
 position: absolute;
 padding: 0 .5em;
 left: 20px;
 top: -15px;
 font-weight: bold;
 background-color: #fff; /* タイトル背景色 */
 color: #555555; /* タイトル文字色 */
}
HTML
<div class="kakomi-box11"><span class="title-box11">タイトル</span>テキスト</div>
- 影を付けて立体感を出しました。「box-shadow」の行を削除すると消すことができます。

CSS
/* タイトル付 枠(影)1 */
.kakomi-box12 {
 position: relative;
 margin: 2em auto;
 padding: 1.2em;
 width: 90%;
 color: #555555; /* 文字色 */
 background-color: #fff;
 border: 2px solid #8FBC8F; /* 枠線の太さ・色 */
 box-shadow: 2px 2px 1px #ccc;/* 影の色 */
}
.title-box12 {
 position: absolute;
 padding: 0 .5em;
 left: 20px;
 top: -15px;
 font-weight: bold;
 background-color: #fff; /* タイトル背景色 */
 color: #8FBC8F; /* タイトル文字色 */
}
HTML
<div class="kakomi-box12"><span class="title-box12">タイトル</span>テキスト</div>

CSS
/* タイトル付 枠(影)2 */
.kakomi-box13 {
 position: relative;
 margin: 2em auto;
 padding: 1.2em;
 width: 90%;
 color: #555555; /* 文字色 */
 background-color: #fff;
 border: 2px solid #f09199; /* 枠線の太さ・色 */
 box-shadow: 0 0 5px 2px #fce2c4 inset;/* 影の色 */
}
.title-box13 {
 position: absolute;
 padding: 0 .5em;
 left: 20px;
 top: -15px;
 font-weight: bold;
 background-color:  #fff; /* タイトル背景色 */
 color: #f09199; /* タイトル文字色 */
}
HTML
<div class="kakomi-box13"><span class="title-box13">タイトル</span>テキスト</div>

CSS
/* タイトル付 枠(影)3 */
.kakomi-box14 {
 position: relative;
 margin: 2em auto;
 padding: 1.2em;
 width: 90%;
 color: #555555; /* 文字色 */
 background-color: #fff;
 border: 4px double #CC0033; /* 枠線の太さ・色 */
 box-shadow: 2px 2px 2px #ccc;/* 影の色 */
}
.title-box14 {
 position: absolute;
 padding: 0 .5em;
 left: 20px;
 top: -15px;
 font-weight: bold;
 background-color:  #fff; /* タイトル背景色 */
 color: #CC0033; /* タイトル文字色 */
}
HTML
<div class="kakomi-box14"><span class="title-box14">タイトル</span>テキスト</div>
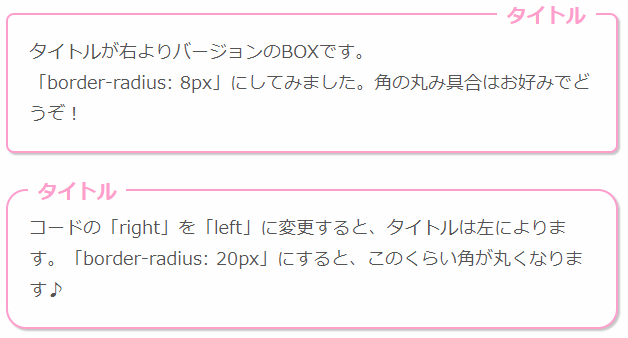
- タイトル部分のコードを「right」⇒「left」に変更して使用できます。
CSS
/* 角丸 影(タイトル)4 */
.kakomi-maru4 {
 position: relative;
 margin: 2em auto;
 padding: 1.2em;
 width: 90%;
 border: 2px solid #ff9ece; /* 枠線の太さ・色 */
 color: #555555; /* 文字色 */
 background-color: #fff;
 box-shadow: 2px 2px 1px #c7c7c7;/* 影の色 */
 border-radius: 8px; /* 角の丸み */
}
.title-maru4 {
 position: absolute;
 right: 20px; /*(left)に変更すると左 */
 top: -15px;
 padding: 0 .5em;
 font-weight: bold;
 font-size: 1.1em;
 color: #ff9ece; /* タイトル色 */
 background-color: #fff;
}
HTML
<div class="kakomi-maru4"><span class="title-maru4">タイトル</span>テキスト</div>

CSS
/* タブ タイトル枠 1 */
.kakomi-tab1 {
 position: relative;
 margin: 3em auto;
 padding: 1.2em 1em 1em;
 width: 90%;
 background-color: #f7f7f7; /* BOX背景色 */
 border: 3px double #999999; /* 枠線の太さ・色 */
}
.title-tab1 {
 position: absolute;
 display: inline-block;
 top: -28px; /*タブ調整 */
 left: -3px; /*タブ調整 */
 padding: 0 10px;
 height: 26px;
 font-size: 18px;
 font-weight: bold;
 color: #fff; /* タイトル色 */
 background-color: #a0a0a0; /* タイトル背景色 */
 border: 1px solid #999999; /* タイトル枠線 */
 border-radius: 5px 5px 0 0;
}
HTML
<div class="kakomi-tab1"><span class="title-tab1">タイトル</span>テキスト</div>
タイトルの位置を微調整するには、/*タブ調整 */と書いてある「top」や「left」を1pxずつ調整してみて下さい。
- 影を付けて立体感を出しました。「box-shadow」の行を削除すると消すことができます。

CSS
/* タブ タイトル枠 2 */
.kakomi-tab2 {
 position: relative;
 margin: 3em auto;
 padding: 1.2em 1em 1em;
 width: 90%;
 background-color: #fff; /*BOX背景色 */
 border: 2px solid #8d93c8; /* 枠線の太さ・色 */
 box-shadow: 2px 2px 2px #ccc; /* 影の色 */
}
.title-tab2 {
 position: absolute;
 display: inline-block;
 top: -28px; /*タブ調整 */
 left: -2px; /*タブ調整 */
 padding: 1px 10px;
 height: 26px;
 font-weight: bold;
 color: #fff; /* タイトル色 */
 background-color: #8d93c8; /* タイトル背景色 */
 border-radius: 8px 8px 0 0;
}
HTML
<div class="kakomi-tab2"><span class="title-tab2">タイトル</span>テキスト</div>
タイトルの位置を微調整するには、/*タブ調整 */と書いてある「top」や「left」を1pxずつ調整してみて下さ
スポンサーリンク
シュッとした 囲み枠
スタイリッシュ? スマート? よくわかりませんが・・・「シュッとしてるなぁ」という雰囲気のBOXです。
- 幅いっぱいに広げる場合は「width: 90%;」の行を削除して下さい。

CSS
/* トリプル 囲み枠 */
.kakomi-triple1 {
 position: relative;
 border: 1px solid #007b43; /*左枠線*/
 width: 90%;
 margin: 2em auto;
 padding: 20px 15px 15px 20px;
 z-index: 0;
}
.kakomi-triple1::before,
.kakomi-triple1::after {
 position: absolute;
 content: '';
 width: 100%;
 height: 100%;
}
.kakomi-triple1::before {
 border: 1px solid #3eb370; /*中枠線*/
 bottom: -4px;
 right: -4px;
 z-index: 1;
}
.kakomi-triple1::after {
 border: 1px solid #7ebea5; /*右枠線*/
 bottom: -7px;
 right: -7px;
 z-index: 2;
}
HTML
<div class="kakomi-triple1">テキスト</div>
- タイトルが長すぎるとデザインが崩れる場合があります。
- 影は「box-shadow:」の行を削除すると消せます。※「 } 」波括弧は削除しないで下さい。

CSS
/* スマート 囲み枠 1 */
.kakomi-smart1 {
 position: relative;
 margin: 2em auto;
 padding: 2.5em 1em 1em;
 width: 90%; /* ボックス幅 */
 border-style: solid;
 border-color: #82ca9c; /* 枠の色 */
 border-width: 5px 1px 1px;
 background-color: #f7f7f7; /* 背景色 */
 color: #666; /* テキスト色 */
 box-shadow: 1px 1px 3px #ccc; /* 影 */
}

.title-smart1 {
 position: absolute;
 top: 8px;
 left: 15px;
 background-color: #f7f7f7; /* タイトル背景色 */
 color: #82ca9c; /* タイトル色 */
 font-size: 1.1em;
 font-weight: bold;
}
HTML
<div class="kakomi-smart1"><span class="title-smart1">タイトル</span>テキスト</div>

CSS
/* スマート 囲み枠 2 */
.kakomi-smart2 {
 position: relative;
 margin: 2em auto;
 padding: 3em 1em .8em;
 width: 90%; /* ボックス幅 */
 border-style: solid;
 border-width: 5px 0 0 0;
 border-color: #907b6e; /* 枠の色 */
 background-color: #ede4cd; /* 背景色 */
 color: #666; /* テキスト色 */
 box-shadow: 0 0 3px #999; /* 影の色 */
}
.title-smart2{
 position: absolute;
 top: 8px;
 left: 15px;
 background-color: #ede4cd; /* タイトル背景色 */
 color: #907b6e; /* タイトル色 */
 font-size: 1.1em;
 font-weight: bold;
 border-style: none none double;
 border-color: #907b6e; /*タイトル下線 */
 border-width: 3px;
}
HTML
<div class="kakomi-smart2"><span class="title-smart2">タイトル</span>テキスト</div>
「補足・解説」に便利! 右寄せBOX
左を少し空けて右寄せにしたBOXに見えないBOXです・・・
- 左側のスペースは「margin」から簡単に調整できます。
- フォントサイズを気持ち小さくしてあります。「font-size: 0.9em」⇒「font-size: 1em」にすればお使いのサイズに戻ります。
- 線のカラーを変更して使って下さいね。

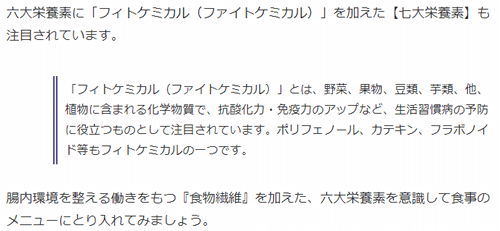
CSS
/* 補足BOX 1 */
.kakomi-hosoku1 {
 margin: 2em 0em 2em 4em; /* 枠外との間隔(上、右、下、左) */
 padding: 5px 10px;
 font-size: 0.9em; /* 文字サイズ */
 border-left: 6px double #4d4398; /* 線の太さ・線種・色 */
}
HTML
<div class="kakomi-hosoku1">テキスト</div>
「margin: 2em 0em 2em 4em」最後の数値を大きくすると、左側のスペースが広がります。

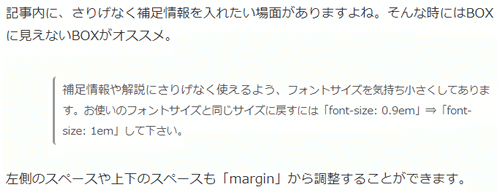
CSS
/* 補足BOX 2 */
.kakomi-hosoku2 {
 margin: 2em 0em 2em 4em; /* 枠外との間隔(上、右、下、左) */
 padding: 5px 10px;
 font-size: 0.9em; /* 文字サイズ */
 color: #555555; /* 文字色 */
 border-left: 3px solid #999999; /* 線の太さ・線種・色 */
 border-radius: 5px;
}
HTML
<div class="kakomi-hosoku2">テキスト</div>
「margin: 2em 0em 2em 4em」最後の数値を大きくすると、左側のスペースが広がります。
ふんわり シャドー 囲み枠
シャドーを使って、ふんわりとボカシてみた優しい印象のBOXです。
- 幅いっぱいに広げる場合は「width: 90%;」の行を削除して下さい。

CSS
/* ふんわり 枠 1 */
.kakomi-kage1 {
 margin: 2em auto;
 padding: 1em;
 width: 90%;
 color: #555555; /* 文字色 */
 background-color: #ffcccc; /* 背景色 */
 box-shadow: 0 0 10px 10px #ffcccc; /* 影 */
}
HTML
<div class="kakomi-kage1">テキスト</div>
- クレヨンや水彩ペンで書いたような囲み枠。お好みのカラーに変更して使って下さいね。

CSS
/* ふんわり 枠 2 */
.kakomi-kage2 {
 margin: 2em auto;
 padding: 1em;
 width: 90%;
 color: #555555; /* 文字色 */
 background-color: #fff; /* 背景色 */
 box-shadow: 0 0 5px 5px #bce2e8, 0 0 5px 3px #bce2e8 inset; /* 影 */
 border-radius: 10px; /*角の丸み*/
}
HTML
<div class="kakomi-kage2">テキスト</div>
枠線は2種類の影を合わせて作っているため、線のカラーを変更するときは「box-shadow」にある2ヶ所の#bce2e8を変更して下さい。
- タイトル付き「ふんわりBOX」です。タイトルが長すぎるとデザインが崩れる場合があります。

CSS
/* ふんわり 枠 3 */
.kakomi-kage3 {
 position: relative;
 margin: 2em auto;
 padding: 2.5em 1em .5em;
 width: 90%;
 background-color: #badcad; /* 背景色 */
 color: #555; /* 文字色 */
 box-shadow: 0 0 10px 10px #badcad; /* 影 */
}
.title-kage3 {
 position: absolute;
 left: 10px;
 top: 2px;
 padding: 0 .5em;
 font-weight: bold;
 color: #769164; /* タイトル色 */
 border-style: none none solid;
 border-color: #d6e9ca; /*タイトル下線 */
 border-width: 3px;
}
HTML
<div class="kakomi-kage3"><span class="title-kage3">タイトル</span>テキスト</div>
タイトル下の線(アンダーライン)を消す場合、CSSコード「border-style」「border-color」「border-width」3行を削除します。
※下の「 } 」波括弧は消さないように気をつけて下さいね。
- 「ふんわり手書き風BOX」です。枠や背景色をアレンジして下さいね。

CSS
/* ふんわり手書き枠 4 */
.kakomi-kage4 {
 margin: 2em auto;
 padding: 1em;
 width: 90%;
 color: #555555; /* 文字色 */
 background-color: #FFFFE0; /* 背景色 */
 box-shadow: 0 0 5px 2px #ffa042, 0 0 5px 2px #ffa042 inset; /* 影 */
 border-radius: 2em .7em 3em .9em/.8em 3em .7em 2em; /*角の丸み*/
}
HTML
<div class="kakomi-kage4">テキスト</div>
枠線を2重の「box-shadow」であらわしているため、カラーの変更は2ヶ所になります。
※下の「 } 」波括弧は消さないように気をつけて下さい。
ワンポイント 囲み枠
- シンプルな普通のBOXをクリップで留めてみました。
- 影(シャドー)が不要な時は「box-shadow」を行ごと削除(ボックスとクリップの2箇所あり)します。※「 } 」波括弧は削除しないで下さい。

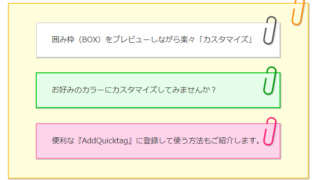
このボックス↑を使って、クリップ・枠線・背景色などのカスタマイズする方法を紹介しているページを作成しました。カスタマイズに自信がない…そんな方は是非ご覧下さい。
→ 【初心者さん向け】プレビューしながら「囲み枠」を簡単カスタマイズ
CSS
/* メモ クリップ A */
.clip-box-a {
 position: relative;
 margin: 2em auto;
 padding: 15px 35px 15px 25px;
 width: 90%; /* ボックス幅 */
 background-color: #fff; /* ボックス背景色 */
 color: #555555; /* 文章色 */
 border: 1px solid #ccc; /* 枠線 */
 box-shadow: 1px 1px 1px #acacac; /* 影の色 */
}
.clip-box-a::before {
 position: absolute;
 content: '';
 top: -15px;
 right: 10px;
 height: 55px;
 width: 15px;
 border: 3px solid #555555; /*クリップ色 */
 background-color: none;
 border-radius: 12px;
 box-shadow: 1px 1px 2px #999;
 transform: rotate(10deg);
 z-index: 1;
}
.clip-box-a::after {
 position: absolute;
 content: '';
 top: 0px;
 width: 10px;
 right: 20px;
 border: solid 5px #fff; /*背景色と同じ色にする*/
 z-index: 2;
}
HTML
<div class="clip-box-a">テキスト</div>
背景色を変更した時は、CSSコード下から2行目「border: solid 5px #fff;」←カラーコードも同じ色に変更して下さい。
- 上の用紙は「ボックス背景色」下の用紙は「影の色」で変更できます。

CSS
/* メモ クリップ B */
.clip-box-b {
 position: relative;
 margin: 2em auto;
 padding: 15px 35px 15px 25px;
 width: 90%; /* ボックス幅 */
 background-color: #FFE4E1; /* ボックス背景色 */
 color: #666666; /* 文章色 */
 box-shadow: 4px 4px 1px #FFB6C1; /* 影の色 */
}
.clip-box-b::before {
 position: absolute;
 content: '';
 top: -15px;
 right: 10px;
 height: 55px;
 width: 15px;
 border: 3px solid #C0C0C0; /*クリップ色 */
 background-color: none;
 border-radius: 12px;
 box-shadow: 1px 1px 2px #ccc; /*クリップ影*/
 transform: rotate(10deg);
 z-index: 1;
}
.clip-box-b::after {
 position: absolute;
 content: '';
 top: 0px;
 width: 10px;
 right: 20px;
 border: solid 5px #FFE4E1; /*背景色と同じ色に!*/
 z-index: 2;
}
HTML
<div class="clip-box-b">テキスト</div>
背景色を変更した時は、CSSコード下から2行目「border: solid 5px #FFE4E1;」←カラーコードも同じ色に変更して下さい。
- ホッチキスで留めた囲みボックスです。

CSS
/* メモ ホチキス A */
.Hochi-box-a {
 position: relative;
 margin: 2em auto;
 padding: 20px 20px 20px 35px;
 width: 90%; /* ボックス幅 */
 background-color: #fff; /* ボックス背景色 */
 color: #555555; /* 文章色 */
 border: 1px solid #d9333f; /* 枠線 */
 box-shadow: 2px 2px 2px #ccc; /* 影の色 */
}
.Hochi-box-a::before {
 position: absolute;
 content: '';
 top: 5px;
 left: 20px;
 height: 30px;
 border: 1.5px solid #d9333f; /* ホチキス色 */
 border-radius: 12px;
 box-shadow: 1px 1px 1px #333;
 transform: rotate(45deg);
}
HTML
<div class="Hochi-box-a">テキスト</div>

CSS
/* メモ ホチキス B */
.Hochi-box-b {
 position: relative;
 margin: 2em auto;
 padding: 35px 20px 15px;
 width: 90%; /* ボックス幅 */
 background: #fff; /* ボックス背景色 */
 color: #555555; /* 文章色 */
 border: 1px solid #ccc; /* 枠線 */
 box-shadow: 1px 1px 2px #ccc; /* 影 */
}
.Hochi-box-b::before,
.Hochi-box-b::after {
 position: absolute;
 content: '';
 top: 15px;
 width: 30px;
 border: 1.5px solid #C0C0C0; /*ホチキス*/
 border-radius: 20px;
 box-shadow: 0 -1px 2px #555;
}
.Hochi-box-b::before { left: 80px;}
.Hochi-box-b::after { right: 80px;}
HTML
<div class="Hochi-box-b">テキスト</div>
- パンチで穴をあけた風の囲みボックスです。

CSS
/* パンチ BOX A */
.punch-box-a {
 position: relative;
 margin: 2em auto;
 padding: 40px 20px 15px;
 width: 90%; /* ボックス幅 */
 background-color: #f7f7f7; /* ボックス背景色 */
 color: #666666; /* 文章色 */
 border: 1px solid #ccc; /* 枠線 */
 box-shadow: 1px 1px 2px #ccc; /* 影 */
}
.punch-box-a::before,
.punch-box-a::after {
 position: absolute;
 content: '';
 top: 10px;
 width: 18px;
 height : 18px;
 background-color: #fff; /*穴背景色*/
 box-shadow: -1px -1px 8px #cccccc inset;
 border: 1px solid #ccc; /*穴*/
 border-radius: 50%;
}
.punch-box-a::before { left: 80px;}
.punch-box-a::after { right: 80px;}
HTML
<div class="punch-box-a">テキスト</div>

CSS
/* パンチ BOX B */
.punch-box-b {
 position: relative;
 margin: 2em auto;
 padding: 40px 20px 15px;
 width: 90%; /* ボックス幅 */
 background: #FFFAF0; /* ボックス背景色 */
 color: #666; /* 文章色 */
 border: 2px solid #FFDEAD; /* ボックス枠線 */
 border-radius: 5px;
 box-shadow: 0 0 3px #ccc; /* 影 */
}
.punch-box-b::before,
.punch-box-b::after {
 position: absolute;
 content: '';
 top: 10px;
 width: 18px;
 height : 18px;
 background: #fff; /*穴背景色*/
 box-shadow: 0 0 8px #cccccc inset;
 border: 1px solid #FFDEAD; /*パンチ穴枠*/
 border-radius: 50%;
}
.punch-box-b::before { left: 80px;}
.punch-box-b::after { right: 80px;}
HTML
<div class="punch-box-b">テキスト</div>

CSS
/* パンチ BOX C */
.punch-box-c {
 position: relative;
 margin: 2em auto;
 padding: 15px 15px 15px 35px;
 width: 90%; /* ボックス幅 */
 background-color: #F0F8FF; /* ボックス背景色 */
 color: #666; /* 文章色 */
 border: 1px solid #88b5d3; /* ボックス枠線 */
 box-shadow: 0 0 2px 1px #ccc; /* 影 */
 border-radius: 10px; /* 角の丸み */
}
.punch-box-c::before {
 position: absolute;
 content: '';
 left: 8px;
 top: 8px;
 width: 17px;
 height : 17px;
 background-color: #fff; /*穴背景色*/
 box-shadow: 0 0 8px #aaa inset; /*穴の影*/
 border: 1px solid #88b5d3; /*パンチ穴枠色*/
 border-radius: 50%;
}
HTML
<div class="punch-box-c">テキスト</div>
影(シャドー)を削除する場合「box-shadow」と書いてある2ヶ所を行ごと削除して下さい。
テープを使った《オシャレ》囲み枠
- ちょっとしたメモ用紙をテープで留めた風なので、ボックス幅90% ⇒ 60%くらいにするのもいいですね。

CSS
/* テープ 枠 1 */
.kakomi-tape1 {
 position: relative;
 margin: 3em auto;
 padding: 35px 20px 15px;
 width: 90%; /*ボックス幅*/
 color: #555555; /* 文字色 */
 background-color: #E6E6FA; /*背景色*/
 box-shadow: 0 2px 2px #ccc; /* 影 */
}
.kakomi-tape1::before {
 position: absolute;
 top: -1.5em;
 left: 35%;
 height: 40px;
 width: 160px; /*テープの幅*/
 content: "";
 border: 1px solid #ccc; /*枠太さ・色*/
 background-color: #FFF; /*テープ色*/
 opacity: 0.3; /*テープ透明度0~1*/
 transform: rotate( -5deg ); /*テープ角度*/
}
HTML
<div class="kakomi-tape1">テキスト</div>

CSS
/* テープ 枠 2 */
.kakomi-tape2 {
 position: relative;
 width: 90%;
 margin: 2.5em auto;
 padding: 35px 30px 20px;
 color: #770000;/* 文字色 */
 background-color: #e8ddbd; /*枠背景色*/
 box-shadow: inset 0 0 40px rgba(204, 186, 136,1), 0 2px 2px #ccc;
}
.kakomi-tape2::before {
 display: block;
 position: absolute;
 content: "";
 width: 140px;
 height: 35px;
 left: 35%;
 top: -16px;
 background-color: rgba(204, 186, 136,0.3);/*テープ色*/
 box-shadow: 0 0 3px rgba(0,0,0,0.1);
 transform: rotate( -3deg ); /*テープ角度*/
}
HTML
<div class="kakomi-tape2">テキスト</div>
- テープ風「タイトル付」囲み枠

CSS
/* テープ 枠 3 */
.kakomi-tape3 {
 position:relative;
 padding: 35px 20px 15px;
 margin: 2.5em auto;
 width: 90%;
 color: #555555; /* 文字色 */
 background-color: #e8ddbd;
 box-shadow: inset 0 0 40px rgba(204, 186, 136,1), 0 2px 2px #ccc;
}
.title-tape3 {
 position: absolute;
 top: -15px;
 left: 30px;
 padding: 4px 20px;
 color: #555555; /*タイトル色*/
 font-weight: bold;
 background-color: rgba(255,255,255,.4);
 border-left: 2px dotted rgba(0,0,0,.1);
 border-right: 2px dotted rgba(0,0,0,.1);
 box-shadow: 0 0 5px rgba(0,0,0,0.2);
 transform: rotate(-5deg);
}
HTML
<div class="kakomi-tape3"><span class="title-tape3">タイトル</span>テキスト</div>

CSS
/* テープ 枠 4 */
.kakomi-tape4 {
 position:relative;
 padding: 35px 20px 20px;
 margin: 2.5em auto;
 width: 90%;
 color: #555555; /* 文字色 */
 background-color: #e0ebaf; /*BOX背景色*/
 box-shadow: 0 2px 5px #999;
}
.title-tape4 {
 position: absolute;
 top: -15px;
 left: 30px;
 padding: 4px 20px;
 color: #555555; /*タイトル色*/
 font-weight: bold;
 background-color: rgba(255,255,255,.1);
 border-left: 2px dotted rgba(0,0,0,.1);
 border-right: 2px dotted rgba(0,0,0,.1);
 box-shadow: 0 0 5px rgba(0,0,0,0.2);
 transform: rotate(-3deg);
}
HTML
<div class="kakomi-tape4"><span class="title-tape4">タイトル</span>テキスト</div>
スポンサーリンク
黒板風(チョーク付き)囲み枠 CSS
黒板といえばチョークです! なかなかイイ感じになりました。
- 画像やアイコンは使わず、CSSのみで表現しています。
- もちろんレスポンシブ対応です。

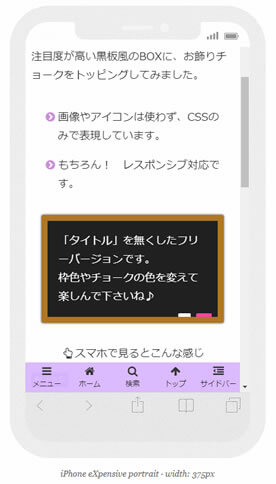
CSS
/* 黒板風 1 */
.kokuban-s1 {
 position: relative;
 margin: 2em auto;
 padding: 1em;
 width: 90%; /* ボックス幅 */
 background: #202020; /* ボックス背景色 */
 color: #fff; /* 文章色 */
 border: 7px solid #b2771f; /* 枠線 */
 border-radius: 3px; /* 角の丸み */
 box-shadow: 0 0 5px #333;
}
.kokuban-s1::before,
.kokuban-s1::after {
 position: absolute;
 content: '';
 bottom: 0;
}
.kokuban-s1::before {
 width: 20px;
 right: 10px;
 border: solid 3px #ff42a0; /*チョーク(ピンク) */
 border-radius: 3px 2px 0 2px;
}
.kokuban-s1::after {
 width: 15px;
 right: 45px;
 border: solid 3px #fff; /*チョーク(白) */
 border-radius: 8px 5px 2px 5px;
}
HTML
<div class="kokuban-s1">テキスト</div>

CSS
/* 黒板風 2 */
.kokuban-s2 {
 position: relative;
 margin: 2em auto;
 padding: 1em;
 width: 90%; /* ボックス幅 */
 background: #006633; /* ボックス背景色 */
 color: #fff; /* 文章色 */
 border: 8px solid #b2771f; /* 枠線 */
 border-radius: 3px; /* 角の丸み */
 box-shadow: 0 0 5px #333, 0 0 5px #555 inset;
}
.kokuban-s2::before,
.kokuban-s2::after {
 position: absolute;
 content: '';
 bottom: 0;
}
.kokuban-s2::before {
 width: 20px;
 right: 10px;
 border: solid 3px #ffff00; /*チョーク(黄色)*/
 border-radius: 3px 2px 0 2px;
}
.kokuban-s2::after {
 width: 15px;
 right: 45px;
 border: solid 3px #fff; /*チョーク(白) */
 border-radius: 8px 5px 2px 5px;
}
HTML
<div class="kokuban-s2">テキスト</div>
- 黒板のフレームをスチール風にしてみました。

CSS
/* 黒板風 3 */
.kokuban-s3 {
 position: relative;
 margin: 2em auto;
 padding: 1em;
 width: 90%; /* ボックス幅 */
 background: #006633; /* ボックス背景色 */
 color: #fff; /* 文章色 */
 border: 5px solid #C0C0C0; /* 枠線 */
 border-radius: 2px; /* 角の丸み */
 box-shadow: 0 0 5px #333, 0 0 5px #555 inset;
}
.kokuban-s3::before,
.kokuban-s3::after {
 position: absolute;
 content: '';
 bottom: 0;
}
.kokuban-s3::before {
 width: 20px;
 right: 10px;
 border: solid 3px #ff42a0; /*チョークピンク */
 border-radius: 3px 2px 0 2px;
}
.kokuban-s3::after {
 width: 15px;
 right: 45px;
 border: solid 3px #fff; /*チョーク白 */
 border-radius: 8px 5px 2px 5px;
}
HTML
<div class="kokuban-s3">テキスト</div>

CSS
/* 黒板風 4 */
.kokuban-s4 {
 position: relative;
 margin: 2em auto;
 padding: 1em;
 width: 90%; /* ボックス幅 */
 background: #FF69B4; /* ボックス背景色 */
 color: #fff; /* 文章色 */
 border: 5px solid #e6b422; /* 枠線 */
 border-radius: 3px; /* 角の丸み */
 box-shadow: 0 0 5px #333, 0 0 2px #777 inset;
}
.kokuban-s4::before,
.kokuban-s4::after {
 position: absolute;
 content: '';
 bottom: 0;
 box-shadow: 0 0 3px #999;
}
.kokuban-s4::before {
 width: 18px;
 right: 12px;
 border: solid 3px #ffff00; /*チョーク(黄色) */
 border-radius: 3px 2px 0 2px;
}
.kokuban-s4::after {
 width: 15px;
 right: 45px;
 border: solid 3px #fff; /*チョーク(白) */
 border-radius: 8px 5px 2px 5px;
}
HTML
<div class="kokuban-s4">テキスト</div>
黒板風 「タイトル付」 囲み枠
- 画像やアイコンは使わず、CSSのみで表現しています。
- 幅いっぱいに広げる場合は「width: 90%;」の行を削除して下さい。

CSS
/* 黒板風 タイトル 1 */
.kokuban-t1 {
 position: relative;
 margin: 2em auto;
 padding: 3.2em 1em 1em;
 width: 90%; /* ボックス幅 */
 background-color: #202020; /* ボックス背景色 */
 color: #fff; /* 文章色 */
 border: 10px solid #8b4513; /* 枠線 */
 border-radius: 3px; /* 角の丸み */
 box-shadow: 0 0 5px #333;
}
.kokuban-t1::before,
.kokuban-t1::after {
 position: absolute;
 content: '';
 bottom: 0;
}
.kokuban-t1::before {
 right: 10px;
 border: solid 3px #ff7fbf; /*チョーク(ピンク)*/
 width: 20px;
 border-radius: 3px 2px 0 2px;
}
.kokuban-t1::after {
 right: 40px;
 border: solid 3px #fff; /*チョーク(白)*/
 width: 15px;
 border-radius: 8px 5px 2px 5px;
}
.title-t1 {
 position: absolute;
 left: 1em;
 top: .5em;
 font-weight: bold;
 font-size: 1.1em;
 color: #ff7fbf; /* タイトル色 */
}
HTML
<div class="kokuban-t1"><span class="title-t1">タイトル</span>テキスト</div>

CSS
/* 黒板風 タイトル 2 */
.kokuban-t2 {
 position: relative;
 margin: 2em auto;
 padding: 3.2em 1em 1em;
 width: 90%; /* ボックス幅 */
 background-color: #006633; /* ボックス背景色 */
 color: #fff; /* 文章色 */
 border: 8px solid #b2771f; /* 枠線 */
 border-radius: 3px; /* 角の丸み */
 box-shadow: 0 0 5px #333, 0 0 5px #555 inset;
}
.kokuban-t2::before,
.kokuban-t2::after {
 position: absolute;
 content: '';
 bottom: 0;
}
.kokuban-t2::before {
 right: 10px;
 border: solid 3px #fff; /*チョーク(白)*/
 width: 20px;
 border-radius: 3px 2px 0 2px;
}
.kokuban-t2::after {
 right: 40px;
 border: solid 3px #ffff6b; /*チョーク(黄色)*/
 width: 15px;
 border-radius: 8px 5px 2px 5px;
}
.title-t2 {
 position: absolute;
 left: 1em;
 top: .5em;
 font-weight: bold;
 font-size: 1.1em;
 color: #ffff6b; /* タイトル色 */
}
HTML
<div class="kokuban-t2"><span class="title-t2">タイトル</span>テキスト</div>

CSS
/* 黒板風 タイトル 3 */
.kokuban-t3 {
 position: relative;
 margin: 2em auto;
 padding: 3.2em 1em 1em;
 width: 90%; /* ボックス幅 */
 background-color: #044072; /* ボックス背景色 */
 color: #fff; /* 文章色 */
 border: 10px solid #b2771f; /* 枠線 */
 border-radius: 3px; /* 角の丸み */
 box-shadow: 0 0 5px #333, 0 0 5px #555 inset;
}
.kokuban-t3::before,
.kokuban-t3::after {
 position: absolute;
 content: '';
 bottom: 0;
}
.kokuban-t3::before {
 right: 10px;
 border: solid 3px #ffff6b; /*チョーク(黄色)*/
 width: 20px;
 border-radius: 3px 2px 0 2px;
}
.kokuban-t3::after {
 right: 40px;
 border: solid 3px #fff; /*チョーク(白)*/
 width: 15px;
 border-radius: 8px 5px 2px 5px;
}
.title-t3 {
 position: absolute;
 left: 1em;
 top: .5em;
 font-weight: bold;
 font-size: 1.1em;
 color: #ffff6b; /* タイトル色 */
}
HTML
<div class="kokuban-t3"><span class="title-t3">タイトル</span>テキスト</div>

CSS
/* 黒板風 タイトル 4 */
.kokuban-t4 {
 position: relative;
 margin: 2em auto;
 padding: 3.2em 1em 1em;
 width: 90%; /* ボックス幅 */
 background-color: #8a2f2e; /* ボックス背景色 */
 color: #fff; /* 文章色 */
 border: 9px solid #b2771f; /* 枠線 */
 border-radius: 3px; /* 角の丸み */
 box-shadow: 0 0 5px #333, 0 0 5px #555 inset;
}
.kokuban-t4::before,
.kokuban-t4::after {
 position: absolute;
 content: '';
 bottom: 0;
}
.kokuban-t4::before {
 right: 10px;
 border: solid 3px #fff; /*チョーク(白)*/
 width: 20px;
 border-radius: 3px 2px 0 2px;
}
.kokuban-t4::after {
 right: 40px;
 border: solid 3px #ffff6b; /*チョーク(黄色)*/
 width: 15px;
 border-radius: 8px 5px 2px 5px;
}
.title-t4 {
 position: absolute;
 left: 1em;
 top: .5em;
 font-weight: bold;
 font-size: 1.1em;
 color: #ffff6b; /* タイトル色 */
}
HTML
<div class="kokuban-t4"><span class="title-t4">タイトル</span>テキスト</div>
- タイトル中央配置バージョンです。

CSS
/* 黒板風 タイトル 5 */
.kokuban-t5 {
 position: relative;
 margin: 2em auto;
 padding: 3.2em 1em 1em;
 width: 90%; /* ボックス幅 */
 background-color: #202020; /* ボックス背景色 */
 color: #fff; /* 文章色 */
 border: 8px solid #b2771f; /* 枠線 */
 border-radius: 3px; /* 角の丸み */
 box-shadow: 0 0 5px #333;
}
.kokuban-t5::before,
.kokuban-t5::after {
 position: absolute;
 content: '';
 bottom: 0;
}
.kokuban-t5::before {
 width: 17px;
 right: 20px;
 border: solid 3px #ffff00; /*チョーク黄 */
 border-radius: 3px 2px 0 2px;
}
.kokuban-t5::after {
 width: 13px;
 right: 55px;
 border: solid 3px #ff7fbf; /*チョークピンク */
 border-radius: 15px 10px 2px 5px;
}
.title-t5 {
 position: absolute;
 top: .5em;
 right: 0;
 left: 0;
 text-align: center;
 font-weight: bold;
 font-size: 1.1em;
 color: #ff7fbf; /* タイトル色 */
}
HTML
<div class="kokuban-t5"><span class="title-t5">タイトル</span>テキスト</div>
ホワイトボード風(マーカー付き)囲み枠
黒板風のチョークに味をしめたので、ホワイトボードにマーカーペンを付けてみました・・・。
- 画像やアイコンは使わず、CSSのみで表現しています。

CSS
/* ホワイトボード風*/
.wboard-w1 {
 position: relative;
 margin: 2em auto;
 padding: 1em 1em 1em;
 width: 90%; /* ボックス幅 */
 background-color: #fff; /* ボックス背景色 */
 color: #000000; /* 文章色 */
 border: 5px solid #C0C0C0; /* 枠線 */
 border-radius: 3px; /* 角の丸み */
 box-shadow: 0 0 8px #333, 0 0 2px #555 inset;
}
.wboard-w1::before,
.wboard-w1::after {
 position: absolute;
 content: '';
 bottom: 3px;
 width: 25px;
 border-radius: 2px;
 box-shadow: 1px 1px 3px #666;
}
.wboard-w1::before {
 right: 55px;
 border: solid 3px #ff0000; /*飾ペン赤 */
}
.wboard-w1::after {
 right: 20px;
 border: solid 3px #333; /*飾ペン黒 */
 transform: rotate(8deg); /*飾ペン角度 */
}
HTML
<div class="wboard-w1">テキスト</div>
ホワイトボード風「タイトル付き」囲み枠

CSS
/* ホワイトボード風 タイトル 2*/
.wboard-w2 {
 position: relative;
 margin: 2em auto;
 padding: 3.2em 1em 1em;
 width: 90%; /* ボックス幅 */
 background-color: #fff; /* ボックス背景色 */
 color: #000000; /* 文章色 */
 border: 5px solid #c6c6c6; /* 枠線 */
 box-shadow: 0 0 8px #333, 0 0 2px #555 inset;
}
.wboard-w2::before,
.wboard-w2::after {
 position: absolute;
 content: '';
 bottom: 4px;
 width: 25px;
 border-radius: 2px;
 box-shadow: 1px 1px 3px #666;
}
.wboard-w2::before {
 right: 60px;
 border: solid 3px #333; /*飾りペン黒 */
 transform: rotate(2deg); /*飾りペン角度 */
}
.wboard-w2::after {
 right: 22px;
 border: solid 3px #ff0000; /*飾りペン赤 */
 transform: rotate(9deg); /*飾りペン角度 */
}
.title-w2 {
 position: absolute;
 top: .6em;
 left: 1em;
 font-weight: bold; /* 太文字 */
 font-size: 1.1em;
 color: #ff0000; /* タイトル文字色 */
}
HTML
<div class="wboard-w2"><span class="title-w2">タイトル</span>テキスト</div>
- タイトルや下線(アンダーライン)のカラーは別々に変更できます。飾りペンも同じ色にすると、しっくりきます。

CSS
/* ホワイトボード風 タイトル 3 */
.wboard-w3 {
 position: relative;
 margin: 2em auto;
 padding: 3em 1em 1em;
 width: 90%; /* ボックス幅 */
 background-color: #fff; /* ボックス背景色 */
 color: #000000; /* 文章色 */
 border: 5px solid #c6c6c6; /* 枠線 */
 box-shadow: 0 0 8px #333, 0 0 2px #555 inset;
}
.wboard-w3::before,
.wboard-w3::after {
 position: absolute;
 content: '';
 bottom: 4px;
 width: 25px;
 border-radius: 2px;
 box-shadow: 1px 1px 3px #666;
}
.wboard-w3::before {
 right: 60px;
 border: solid 3px #333; /*飾ペン黒 */
 transform: rotate(2deg); /*飾ペン角度 */
}
.wboard-w3::after {
 right: 22px;
 border: solid 3px #ff0000; /*飾ペン赤 */
 transform: rotate(9deg); /*飾ペン角度 */
}
.title-w3 {
 position: absolute;
 left: 1em;
 top: .5em;
 font-weight: bold;
 font-size: 1.1em; /* 文字サイズ */
 color: #ff0000; /* タイトル文字色 */
 border-style: none none solid;
 border-color: #ff0000; /*タイトル下線 */
 border-width: 3px;
}
HTML
<div class="wboard-w3"><span class="title-w3">タイトル</span>テキスト</div>
- タイトル部分を「マグネットシート風」にしてみました。
- テキストもマーカーっぽく太字にしましたが「テキスト太字」と書いてある行を削除すると通常に戻せます。

CSS
/* ホワイトボード風 タイトル 4 */
.wboard-w4 {
 position: relative;
 margin: 2em auto;
 padding: 3.5em 1em 1em;
 width: 90%; /* ボックス幅 */
 background: #fff; /* ボックス背景色 */
 font-weight: bold; /* テキスト太字 */
 color: #000000; /* 文章色 */
 border: 5px solid #c6c6c6; /* 枠線 */
 border-radius: 3px; /* 角の丸み */
 box-shadow: 0 0 8px #333, 0 0 2px #555 inset;
}
.wboard-w4::before,
.wboard-w4::after {
 position: absolute;
 content: '';
 width: 25px;
 bottom: 3px;
 border-radius: 2px;
 box-shadow: 1px 1px 3px #666;
}
.wboard-w4::before {
 right: 55px;
 border: solid 3px #ff0000; /*飾ペン赤 */
}
.wboard-w4::after {
 right: 20px;
 border: solid 3px #333; /*飾ペン黒 */
 transform: rotate(8deg); /*飾ペン角度 */
}
.title-w4 {
 position: absolute;
 padding: .1em .5em;
 left: 1em;
 top: .5em;
 font-weight: bold;
 font-size: 1.1em; /* 文字サイズ */
 color: #ff4747; /* タイトル文字色 */
 background-color: #ffffff; /* ボックス背景色 */
 box-shadow: 1px 1px 3px #a0a0a0;
}
HTML
<div class="wboard-w4"><span class="title-w4">タイトル</span>テキスト</div>
テキスト部分の太字を通常に戻す場合、上から7行目「font-weight: bold; /* テキスト太字 */」を行ごと削除して下さい。
- ホワイトボード《木製フレーム》っぽくしてみました。

CSS
/* ホワイトボード風 タイトル 5 */
.wboard-w5 {
 position: relative;
 margin: 2em auto;
 padding: 3.5em 1em 1em;
 width: 90%; /* ボックス幅 */
 background: #fff; /* ボックス背景色 */
 font-weight: bold; /* テキスト太字 */
 color: #000000; /* 文章色 */
 border: 5px solid #e7d38c; /* 枠線 */
 border-radius: 3px; /* 角の丸み */
 box-shadow: 0 0 8px #333, 0 0 2px #555 inset;
}
.wboard-w5::before,
.wboard-w5::after {
 position: absolute;
 content: '';
 width: 25px;
 bottom: 3px;
 border-radius: 2px;
 box-shadow: 1px 1px 3px #666;
}
.wboard-w5::before {
 right: 55px;
 border: solid 3px #0000ff; /*飾ペン青 */
}
.wboard-w5::after {
 right: 20px;
 border: solid 3px #333; /*飾ペン黒 */
 transform: rotate(8deg); /*飾ペン角度 */
}
.title-w5 {
 position: absolute;
 padding: .1em .5em;
 left: 1em;
 top: .5em;
 font-weight: bold;
 font-size: 1.1em; /* 文字サイズ */
 color: #0000ff; /* タイトル文字色 */
 background-color: #ffffff; /* ボックス背景色 */
 box-shadow: 1px 1px 3px #a0a0a0;
}
HTML
<div class="wboard-w5"><span class="title-w5">タイトル</span>テキスト</div>
テキスト部分の太字を通常に戻す場合、上から7行目「font-weight: bold; /* テキスト太字 */」を行ごと削除して下さい。

CSS
/* ホワイトボード風 タイトル 6 */
.wboard-w6 {
 position: relative;
 margin: 2em auto;
 padding: 3.5em 1em 1em;
 width: 90%; /* ボックス幅 */
 background-color: #fffff9; /* ボックス背景色 */
 color: #000; /* 文章色 */
 border: 5px solid #e6b422; /* 枠線 */
 border-radius: 3px; /* 角の丸み */
 box-shadow: 0 0 8px #333, 0 0 2px #555 inset;
}
.wboard-w6::before,
.wboard-w6::after {
 position: absolute;
 content: '';
 width: 25px;
 bottom: 3px;
 border-radius: 2px;
 box-shadow: 1px 1px 3px #666;
}
.wboard-w6::before {
 right: 55px;
 border: solid 3px #333333; /*飾ペン黒 */
}
.wboard-w6::after {
 right: 20px;
 border: solid 3px #ff42a0; /*飾ペンピンク */
 transform: rotate(8deg); /*飾ペン角度 */
}
.title-w6 {
 position: absolute;
 padding: .1em .5em;
 left: 1em;
 top: .5em;
 font-weight: bold;
 font-size: 1.1em; /* 文字サイズ */
 color: #ff42a0; /* タイトル文字色 */
 background-color: #fffff9; /* ボックス背景色 */
 box-shadow: 1px 1px 3px #a0a0a0;
}
HTML
<div class="wboard-w6"><span class="title-w6">タイトル</span>テキスト</div>
カスタマイズ
線種・カラー・太さ・丸め具合などをお好みで変更して、サイトに合った囲み枠を作ってみて下さいね。
- カラー見本 ⇒ 原色大辞典、カラーコード一覧表
- RGBA値 ⇒ カラーコード変換ツール
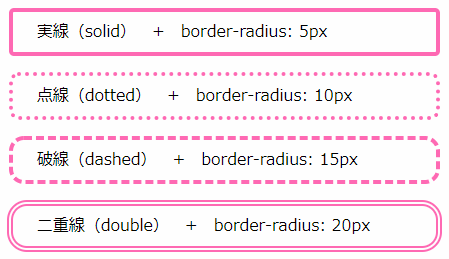
- 線の種類
- 実線 → solid
- 点線 → dotted
- 破線 → dashed
- 二重線 → double
- 角を丸める
- 『 border-radius: ●●px; 』 ← 追加します
- このページで使用しているclass名(例えば「.kakomi-box1」など)は、お好みのclass名に変更できますが、よくわからない場合はそのまま使用することをオススメします。
- テーマでお使いのclass名と重複している場合、BOXが反映されないことがあります。
- class名を変更する時は、CSSとHTMLの両方を変更する必要があります。
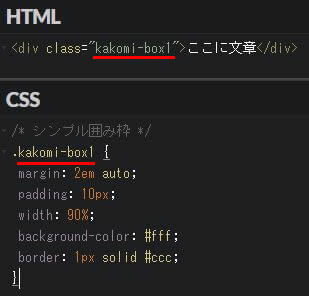
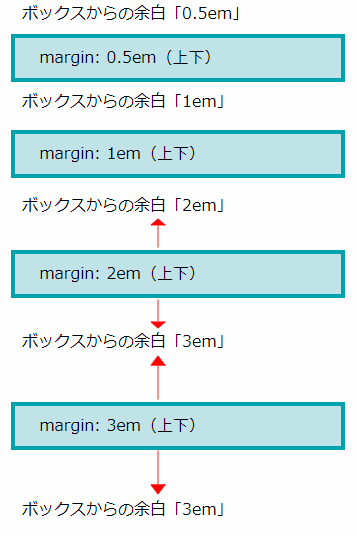
- このページでは、ほとんどのBOXに「margin: 2em auto;」を指定していて「margin: 2em」はBOX外側(上下)の余白を意味します。お好みで調整して下さい。
プレビューしながらカスタマイズ
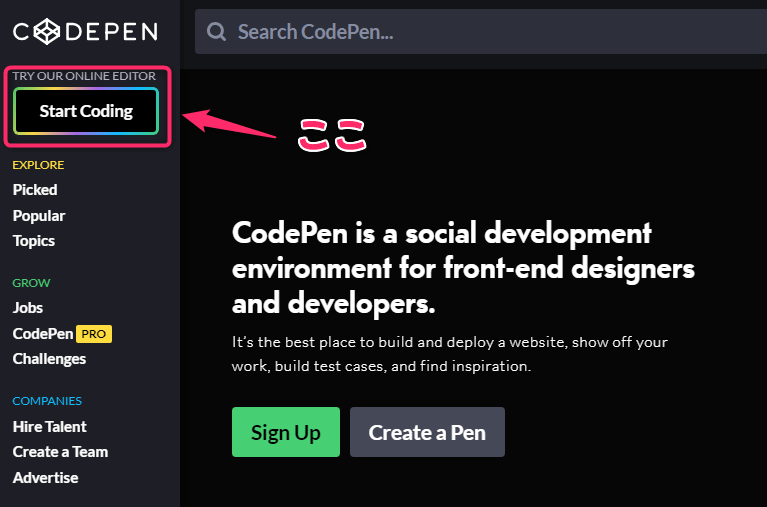
ブラウザ上で動作確認できる「CODEPEN」なら登録しなくても利用できます。
- 画面左の「Start Coding」を開きます。
- CSSとHTMLのコードを、それぞれの場所へ貼り付ければ即時反映され、リアルタイムプレビューで確認できます。
- 右上の「Change Viwe」から画面レイアウトも変更可能。
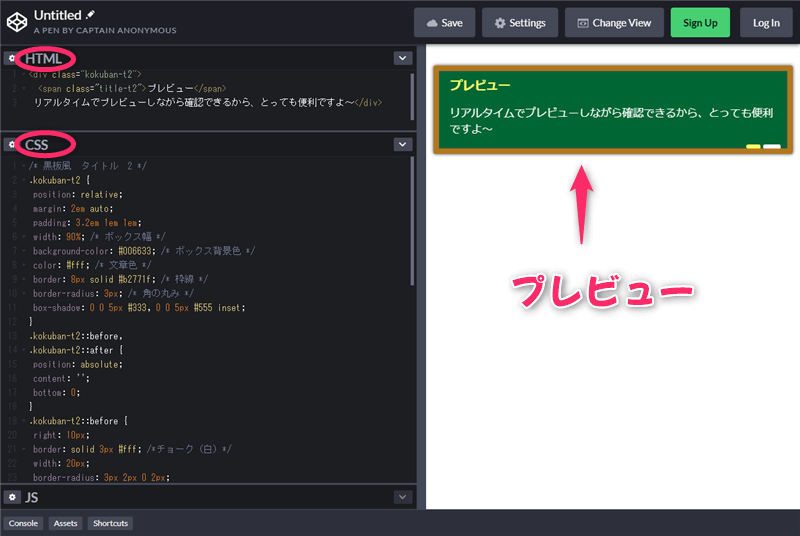
カスタマイズを加えた場合などは、直接スタイルシートに書く前に「CODEPEN」でイメージの確認をしておくことをオススメします。
カスタマイズの仕方がよくわからない・・・そんな方のために、プレビューしながらCSSの色を変更したり、よく使うHTMLを登録できる便利な『AddQuicktag』プラグインの使い方を紹介するページを作りました。
新エディター「Gutenberg(グーテンベルク)」での使い方
プラグインを使わずにWordPressの新ブロックエディター「Gutenberg(グーテンベルク)」で、お好みのBOX(囲み枠・飾り枠)を簡単に使う方法を紹介しています。
- HTMLブロックをテンプレート化して何度でも使い回す
- テンプレート化したブロックを独立させてテキストを自由に書き換える
こちらの記事で解説しております。ぜひご覧ください (*^▽^*)

